Low-code quickstart
You do not necessarily need Node.js, npm or a development server to build an HTML page. If you can edit an HTML file and change a few names, you can publish a custom-looking page that reads from and writes to your base — a styled form, a landing page, a simple read-and-submit tool.
The fastest way in is not to build one from scratch. It is to copy a page that already works and rename it to match your base.
What this approach is good for
Custom-looking forms, lists and info pages that read and write the base in simple ways — the kind of page where the value is the design and simple read/write, not complex logic. If parts of your page need to react to each other (a running total, a list that reloads when a dropdown changes, conditional fields), that is a real application — jump to the developer setup instead. See When this approach stops below.
What this page does
The example below is a small event sign-up page. It:
- reads a list of upcoming sessions from your base and shows them as styled cards;
- lets a visitor pick a session, type their name and email, and click Sign up;
- writes that as a new row in a Signups table, linked back to the chosen session.
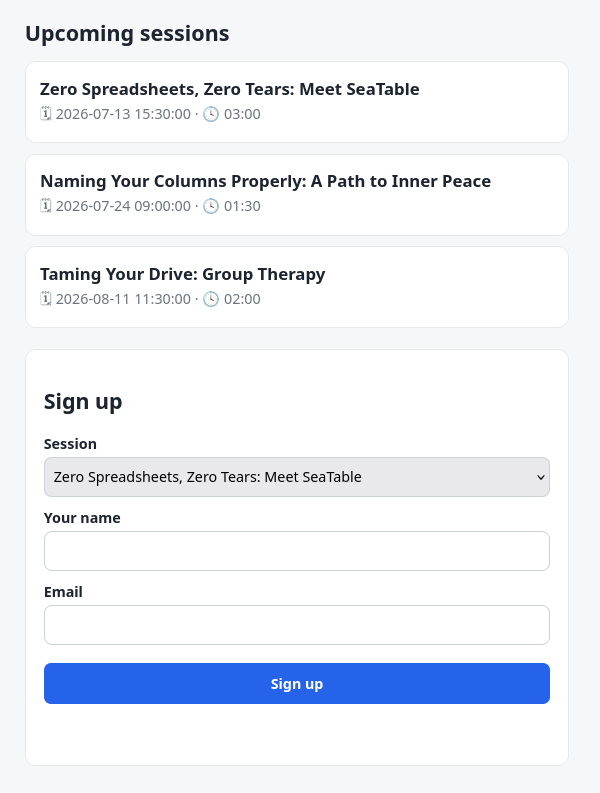
That is the whole loop: read a table → show it → write a row back. Everything else on this page is styling.
Required tables
The page expects two tables. Create them as below, or rename the code (in step 3) to match tables you already have.
Sessions — the events people can sign up for.
| Name | Type | Description |
|---|---|---|
| Title | text | the session name shown on the card |
| Time | date | when the session takes place |
| Duration | duration | how long it runs (comes back in seconds) |
Signups — one row is written here per sign-up.
| Name | Type | Description |
|---|---|---|
| Name | text | the visitor's name |
| the visitor's email | ||
| Session | link | link to Sessions |
What you need
- A text or visual HTML editor — anything from Notepad/TextEdit to a WYSIWYG editor. You only need to change some text.
- A way to make a ZIP file (built into Windows, macOS and Linux).
- A Universal App where you can add an HTML page (step 5).
You do not need an API token for this approach — the page gets its connection from the app once it is uploaded.
The recipe at a glance
Building the page is eight short steps. Each one is detailed below.
- Copy the code into a text editor.
- Save it as
index.html. - Change the table and column names to match your base.
- Zip it — with
index.htmlat the top level. - Add an HTML page to your Universal App.
- Upload the ZIP.
- Grant the page access to its tables.
- Open the page and use it.
The two steps people miss are 3 (some names are changed differently from others) and 7 (skip it and the page loads blank). Both are spelled out below.
1. Copy the code into a text editor
This is the complete, working page. Copy all of it into a plain text editor (or paste it into your visual editor's code view).
<!DOCTYPE html>
<html lang="en">
  <head>
    <meta charset="UTF-8" />
    <meta name="viewport" content="width=device-width, initial-scale=1.0" />
    <title>Event sign-up</title>
    <style>
      /* This is your look — change it freely, it's just CSS. */
      *, *::before, *::after { box-sizing: border-box; } /* widths include padding, so fields line up and don't overflow */
      body { font-family: system-ui, sans-serif; margin: 0; background: #f6f7f9; color: #1c2430; }
      .wrap { max-width: 640px; margin: 0 auto; padding: 24px 16px 64px; }
      h1 { font-size: 1.5rem; }
      .card { background: #fff; border: 1px solid #e6e8ec; border-radius: 12px; padding: 16px; margin: 12px 0; }
      .card h3 { margin: 0 0 4px; }
      .card p { margin: 0; color: #6b7280; }
      form { background: #fff; border: 1px solid #e6e8ec; border-radius: 12px; padding: 20px; margin-top: 24px; }
      label { display: block; font-weight: 600; margin: 12px 0 4px; }
      input, select { width: 100%; padding: 10px; border: 1px solid #cbd2da; border-radius: 8px; font-size: 1rem; }
      button { margin-top: 20px; width: 100%; padding: 12px; border: 0; border-radius: 8px;
               background: #2563eb; color: #fff; font-size: 1rem; font-weight: 600; cursor: pointer; }
      #status { text-align: center; margin-top: 12px; min-height: 1.2em; }
    </style>
  </head>
  <body>
    <div class="wrap">
      <h1>Upcoming sessions</h1>
      <div id="session-list"></div>

      <form id="signup-form">
        <h2>Sign up</h2>
        <!-- Each field has its own <label> so visitors can tell them apart. Keep them. -->
        <label for="session-select">Session</label>
        <select id="session-select"></select>
        <label for="name">Your name</label>
        <input id="name" type="text" required />
        <label for="email">Email</label>
        <input id="email" type="email" required />
        <button type="submit">Sign up</button>
        <p id="status"></p>
      </form>
    </div>

    <!-- Using the "latest" tag is not recommended for production - use a pinned version to ensure stability -->
    <script src="https://unpkg.com/seatable-html-page-sdk@0.0.13/dist/index.min.js"></script>
    <script>
      let sdk;

      // Reads EVERY row of a table (the base returns ~100 at a time) and renames the
      // columns back to the names you see in SeaTable. Leave this helper as it is.
      async function loadTable(tableName) {
        let rows = [], metadata = null, start = 0;
        while (true) {
          const res = await sdk.listRows({ tableName, start, limit: 1000 });
          metadata = metadata || res.data.metadata;
          const page = res.data.results || [];
          rows = rows.concat(page);
          if (page.length === 0) break;
          start += page.length;
        }
        const nameByKey = {};
        (metadata || []).forEach((c) => { nameByKey[c.key] = c.name; });
        return rows.map((row) => {
          const named = { _id: row._id };
          for (const key in row) if (nameByKey[key]) named[nameByKey[key]] = row[key];
          return named;
        });
      }

      // A Duration column comes back as a number of seconds — format it as HH:MM.
      // Leave this helper as it is.
      function formatDuration(seconds) {
        const h = Math.floor(seconds / 3600);
        const m = Math.floor((seconds % 3600) / 60);
        return `${String(h).padStart(2, "0")}:${String(m).padStart(2, "0")}`;
      }

      async function start() {
        sdk = new HTMLPageSDK(window.__HTML_PAGE_DEV_CONFIG__ || null);
        await sdk.init();

        // --- Read the Sessions table -------------------------------------------
        const sessions = await loadTable("Sessions");        // ← your table name (keep the quotes)

        // Show them as cards
        document.getElementById("session-list").innerHTML = sessions
          .map((s) => `<div class="card"><h3>${s.Title}</h3><p>🗓 ${s.Time} · 🕓 ${formatDuration(s.Duration)}</p></div>`)
          //                                   ↑ keep "s." — rename Title / Time / Duration to your columns
          .join("");

        // Fill the dropdown (its value is the row id, used to link the sign-up)
        document.getElementById("session-select").innerHTML = sessions
          .map((s) => `<option value="${s._id}">${s.Title}</option>`)  // ← keep s._id ; rename Title
          .join("");

        // --- Write a Signups row on submit -------------------------------------
        document.getElementById("signup-form").addEventListener("submit", async (e) => {
          e.preventDefault();
          const status = document.getElementById("status");
          try {
            await sdk.addRow({
              tableName: "Signups",                            // ← your table name (keep the quotes)
              rowData: {
                Name: document.getElementById("name").value,   // ← rename "Name" to your text column
                Email: document.getElementById("email").value, // ← rename "Email" to your email column
                Session: [document.getElementById("session-select").value],
                //  ↑ a LINK column always takes a list of row IDs — the [ ] is that list
              },
            });
            status.textContent = "Thanks — you're signed up!";
            e.target.reset();
          } catch (err) {
            status.textContent = "Something went wrong: " + err.message;
          }
        });
      }
      document.addEventListener("DOMContentLoaded", start);
    </script>
  </body>
</html>
2. Save it as index.html
Save the file with the exact name index.html. The name matters — this is the file SeaTable opens first. You can now edit and preview it like any web page.
3. Change the names to match your base
This is the one step where you touch the code — and the part where a first page usually goes wrong. You only change names. The rest — the whole loadTable helper, the structure, the sdk calls — stays exactly as it is.
There are three kinds of names, and they are changed differently:
| In the code | What it is | How to change it |
|---|---|---|
"Sessions", "Signups" | table names, in quotes | replace the text inside the quotes |
s.Title, s.Time | columns you read | keep the s. — replace only Title / Time |
Name:, Email:, Session: | columns you write | replace the whole word before the : |
Keep the s.
s means "the current session row"; .Title is the column on it. So s.Title becomes s.YourColumn — not YourColumn. This one trips everybody up.
Why Session is wrapped in [ ]
Session is a link column (it points at the Sessions table). A link column is always written as a list of row IDs, even for a single link — that is what the [ ] around the value is. The value inside (...select-select").value) is the id of the chosen session.
Two more value facts, for when you adapt the page:
- Single-select / multi-select values come back as the option text you see in SeaTable, not a hidden code.
- For every operation and value shape, see the SDK Reference.
The look — all the HTML and CSS in <style> — is ordinary web design. Change it however you like; it cannot break the base connection. Just keep one <label> per input so visitors know which field is the name and which is the email.
Save the file again when you are done.
4. Zip it
Update resource URLs when you update the page
HTML pages cache JavaScript, CSS, images and other static resources for performance. When you change a resource, update its URL in index.html by adding a new query parameter, for example:
<script src="./app.js?t=1788316923728"></script>
<link rel="stylesheet" href="./style.css?t=1788316923728">
Use a new value each time the resource changes. Otherwise, the browser may continue to use the older cached file.
Make a ZIP archive that contains index.html at the top level — not inside a folder — together with any other files the page needs (images, etc.). The ZIP can have any name.
index.html must be at the root of the ZIP
If you zip the folder instead of its contents, index.html ends up one level down and the upload will not render. Select the files inside the folder, not the folder itself.
Keep images inside the ZIP
Use images you add to your page's files (they travel inside the ZIP). Images stored in a base image column will not display on an HTML page — the app blocks them for security.
5. Add an HTML page to your app
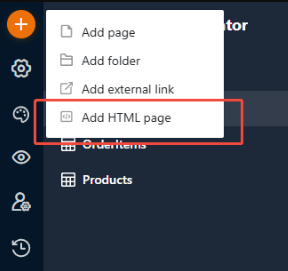
In your Universal App, add a new page and choose Add HTML page.
6. Upload the ZIP
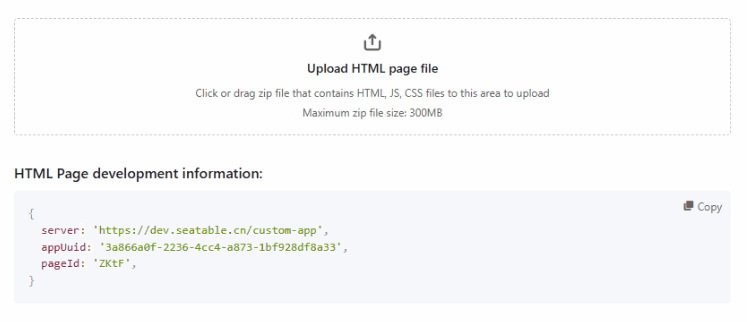
Open the page's configuration and drag your ZIP into the Upload HTML page file area.
7. Grant table access
Do not skip this — it is why a fresh page shows up blank
In the page's settings, explicitly grant access to each table the page reads or writes (here, Sessions and Signups). Without this, the page uploads and loads, but every read returns nothing and every save is rejected — so it looks empty even though nothing is broken. This is the single most common reason a freshly uploaded page "doesn't work."
8. Open the page
Open the app and use the page: you should see the sessions as cards, and signing up should add a row you can find in the Signups table. If the page is blank, go back to step 7 first.
How it works (the mental model)
The page is one index.html with three parts:
- The look — your HTML and CSS. Design it however you want.
- The SDK — one
<script>line that loads the bridge to your base. - The connection — a small script that reads a table (
loadTable) and writes a row (sdk.addRow) on submit.
Everything tricky about reading data — paging past 100 rows, translating column IDs back to names — is already handled inside the loadTable helper, so you never touch it.
Snippets to adapt
Once you are comfortable, this is a small catalogue to pick from. Each snippet is two pieces: an HTML element to drop into your page, and a bit of JS to add inside start() (after sdk.init()). Rename the quoted table names, the s.Column reads and the element ids to match your base — the same three kinds of names as in step 3. The snippets use this page's own Sessions and Signups tables as stand-ins.
For every operation and the exact value shapes, see the SDK Reference.
If something doesn't work
Check these in order — they cover almost every first-upload problem:
- Nothing loads / a save is rejected / the page is blank. The page is missing table access — grant it in the page settings (step 7). This is by far the most common cause.
- Only part of a big table shows. Make sure you kept the
loadTable()helper; it is what pages through every row. - A value is wrong or empty. Check the column name matches the base exactly (capitalisation included), and that you kept the
s.on columns you read (s.Title, notTitle). Select values are the visible text. - A base image doesn't appear. Image-column images can't display here — put the image in the ZIP instead.
When this approach stops
This approach is deliberately limited to reading and writing the base in simple, one-shot ways with a custom look. It stops being enough the moment your page needs its parts to react to each other — for example:
- greying out a session once it is full — counting sign-ups against a capacity, and keeping that count right as people register;
- a total that recalculates as quantities change;
- a list that reloads when a dropdown selection changes;
- fields that appear or hide depending on another field;
- writing to several linked tables from one screen based on what the user did.
That is a genuine application, not a static page. When you reach that point, move to the developer setup: same base, same SDK, but a real project structure that can hold that logic.
Next steps
- SDK Reference: Rows — every read/write operation and the exact value shapes.
- SDK Reference: Files & Images — let visitors upload files from your page.
- Developer setup — when you outgrow a single file.