Developer setup
This is the developer setup: you clone the official template and use a full JavaScript toolchain (Node.js, npm, a Vite dev server with live reload, and a build step). It suits larger or more complex pages.
Prefer no toolchain?
If you just want a form or a small tool, you can build a page in a visual editor with no Node.js or npm at all — see the Low-code quickstart. You can always move up to this setup later.
This guide walks through building an HTML page from the official simple form template: a form that writes submitted records into a base. By the end you will have a packaged ZIP that you can upload to a Universal App.
The template ships the build configuration and project structure you need. It supports two development styles:
- Modular — HTML, JavaScript and CSS split across multiple files. Suited for complex pages.
- Non-modular — everything in a single
index.html. Suited for simple pages.
Choose the approach that fits the complexity of your page. Both produce the same kind of uploadable package.
Base requirements for this example
The form reads products from the base and writes orders back, so it expects three tables:
- Products — with
Product_name(text) andUnit_price(number) - OrderItems — with
Product(link to Products) andQuantity(number) - Orders — with
OrderItems(link to OrderItems)
Create them in your base before running the page, or adapt the table and field names in the template's source.
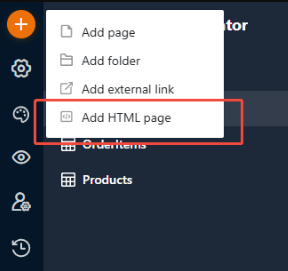
Before you start: add an HTML page in the app
In your Universal App, add a new page and choose Add HTML page. This creates the empty page you will later upload your build to, and it surfaces the server, appUuid and pageId values you need for local development (step 3).
1. Get the template
git clone https://github.com/seatable/seatable-html-page-template-simple-form.git
cd seatable-html-page-template-simple-form
npm install
2. Choose a development style
The active style is controlled by the ESM variable in .env. Vite derives its root from it automatically (src/esm when true, src/classic when false) — you do not edit vite.config.js.
JavaScript and CSS are split into multiple files under src/esm, and the entry file is imported into index.html with type="module". The SDK is used via the npm package (import { HTMLPageSDK } from "seatable-html-page-sdk").
Enable it by setting ESM=true. Either edit .env directly, or copy .env to .env.local (git-ignored) and set it there.
All logic lives in a single index.html under src/classic, with the SDK loaded from a CDN. This is the template default (ESM=false), so no extra configuration is required.
3. Configure local development
During local development, the page needs to know which base to talk to. Create src/setting.js based on setting.template.js:
These values are registered to window.__HTML_PAGE_DEV_CONFIG__ and picked up by the SDK when you call init() in development. See Initialization for how the SDK consumes them.
Where the values come from
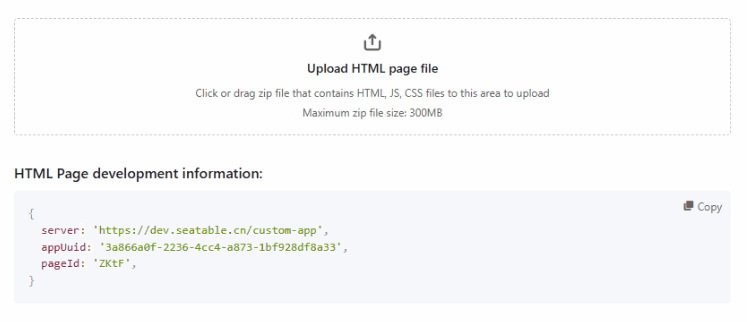
accountToken— an API token you generate in the base in advance. See how to create API tokens.server,appUuidandpageId— shown under HTML page development information in the page's configuration (see below).
The HTML page configuration shows these values ready to copy, alongside the upload area you will use later:
4. Run the development server
Open the local development URL in your browser to preview and test the page. Changes reload live.
5. Build and package
Generate the uploadable ZIP:
This single command cleans the output, runs the Vite build (into dist), and packages it into a ZIP under the page-zip directory. The ZIP is named after the project, for example seatable-html-page-template-simple-form-0.0.1.zip — bump the version in package.json before building so you can tell uploads apart.
Inspecting the build
npm run build-page already runs the build, so you do not call npm run build separately. Run npm run build on its own only if you want to inspect the unpackaged output in dist, or npm run dev to preview it live.
6. Upload and test
- In SeaTable, open the configuration of the HTML page in your Universal App.
- Drag the generated ZIP into the Upload HTML page file area (the same configuration shown in step 3).
- Open the app preview, fill in the form, and submit it.
- Return to the base and confirm that the corresponding records were created.
Once the submitted records appear in the base, the page is fully integrated and ready to use.